
As an Amazon Associate, I earn from qualifying purchases
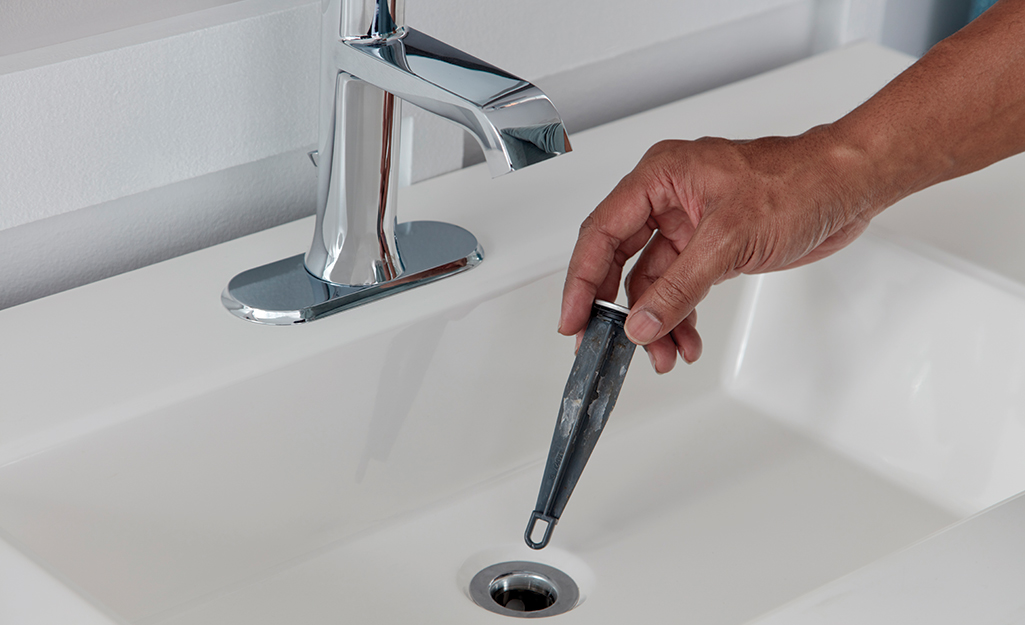
To remove a bathroom sink stopper, locate the pivot rod underneath the sink and unscrew the nut holding the rod in place. Then, pull the pivot rod out and the stopper will come with it.
Are you tired of dealing with a clogged bathroom sink? One common culprit for slow draining is a malfunctioning stopper. Removing the stopper is a simple DIY task that can improve the functionality of your sink. In this guide, we’ll walk you through the steps to remove a bathroom sink stopper, allowing you to address any drainage issues.
This step-by-step guide will help you solve this common plumbing problem, no matter your level of DIY expertise. With these instructions, you can remove a bathroom sink stopper quickly and easily, you can quickly and easily remove a bathroom sink stopper and get your sink working again.
Types Of Bathroom Sink Stoppers
When it comes to bathroom sink stoppers, there are three main types that you may encounter:
Pop-up Stoppers
Pop-up stoppers are commonly found in bathroom sinks and are operated by a lever or knob. Unscrew the pivot rod nut and lift the pop-up stopper out of the drain to remove it.
Push-pull Stoppers
Push-pull stoppers are simple to operate by pushing or pulling the stopper to open or close the drain. To remove a push-pull stopper, you can typically unscrew the top cap and lift the stopper out of the drain.
Lift-and-turn Stoppers
Lift-and-turn stoppers require you to lift and turn the stopper to open or close the drain. The lift-and-turn stopper is removed by unscrewing the top cap and turning it counterclockwise.
Tools Needed For Removal
When removing a bathroom sink stopper, having the right tools is crucial. You can simplify the process by using the right tools. To remove a bathroom sink stopper, you’ll need the following tools.
Adjustable Pliers
Adjustable pliers are an essential tool for removing a bathroom sink stopper. They are versatile and can be adjusted to fit the size of the nut or retaining clip that is holding the stopper in place. With the ability to grip and turn, they provide the necessary leverage to loosen and remove the stopper mechanism.
Flathead Screwdriver
You will also need a flathead screwdriver to remove a bathroom sink stopper. It is useful for prying off the stopper or loosening the retaining nut. The flat, narrow tip of the screwdriver can fit into tight spaces, making it ideal for this task.
Allen Wrench
Depending on the type of bathroom sink stopper, an Allen wrench may also be required. Some stoppers are secured with a set screw that requires an Allen wrench to loosen. Having an Allen wrench set on hand ensures that you have the right size for the set screw on your particular sink stopper.
Step-by-step Removal Process
The process of removing a bathroom sink stopper may seem daunting at first. However, with the right guidance, it can be a straightforward task. You will learn how to identify the stopper type, access the stopper, and either unscrew or pry it out in the following step-by-step instructions.
Identifying Stopper Type
Before you begin, it’s crucial to identify the type of stopper in your bathroom sink. There are various types, including pop-up stoppers, push-pull stoppers, and lift-and-turn stoppers. Each type requires a slightly different removal approach, so knowing which one you have is essential.
Accessing The Stopper
Once you’ve determined the stopper type, the next step is to access it. Under the sink, locate the pivot rod or the nut that holds the stopper in place. In some cases, you may need to remove the horizontal pivot rod or the vertical pivot rod to access the stopper.
Unscrewing Or Prying The Stopper
To remove a stopper, either unscrew it or pry it out. For pop-up stoppers, you’ll typically find a nut on the backside of the drainpipe under the sink that needs to be unscrewed. On the other hand, push-pull stoppers may have a screw underneath the stopper cap that requires unscrewing. If you have a lift-and-turn stopper, you may need to lift it and then turn it counterclockwise to unscrew it. In some cases, stoppers may need to be carefully pried out using a flathead screwdriver.
Dealing With Stubborn Stoppers
Using Lubricants
Apply lubricant around the stopper to loosen it.
Let the lubricant sit for a few minutes.
Use gentle pressure to try to lift the stopper out.
Applying Heat
Heat the stopper with a hairdryer to expand the metal.
Try to lift the stopper out while it’s still warm.
Repeat the heating and lifting process if needed.
Cleaning And Maintenance Tips
Removing Debris
When cleaning your sink stopper, start by removing any visible debris. Use gloves to protect your hands.
Pull out any hair or gunk that may be trapped around the stopper. Dispose of the debris properly.
- Use a plastic drain snake to clear any stubborn clogs
- Flush the drain with hot water to remove remaining debris
Preventing Future Clogs
Regularly clean your sink stopper to prevent build-up and clogs in the future.
Avoid pouring grease or oil down the drain to prevent blockages.
- Install a drain strainer to catch hair and debris before it reaches the drain
- Run hot water through the drain regularly to keep it clear

Replacing The Bathroom Sink Stopper
When replacing the bathroom sink stopper, it’s important to select the right replacement and install it properly to ensure smooth functionality. Here’s a step-by-step guide to help you through the process.
Selecting The Right Replacement
Before you replace your bathroom sink stopper, choose the right one. Here are some key factors to consider:
- Measure the Diameter: Measure the diameter of your current stopper to ensure you choose a replacement of the correct size.
- Material: Consider the material of the replacement stopper. Opt for a durable material that will withstand regular use.
- Style: Choose a replacement stopper that complements the design of your bathroom sink, ensuring a cohesive look.
Installing The New Stopper
Your bathroom sink can be repaired once you have the replacement stopper. Follow these steps for a seamless installation:
- Remove the Old Stopper: Unscrew or lift the old stopper to the sink drain, ensuring it is completely detached.
- Prepare the New Stopper: If the new stopper requires assembly, follow the manufacturer’s instructions to prepare it for installation.
- Insert the New Stopper: Carefully place the new stopper into the sink drain, ensuring it fits securely.
- Test for Functionality: Test the new stopper by filling the sink with water and checking for any leaks or issues with drainage.
Professional Help Vs. Diy
When removing a bathroom sink stopper, you have two options: calling a professional or tackling the task yourself. Each approach has advantages based on your comfort level and the job’s complexity.
When To Call A Professional
If you’re dealing with a complex or stubborn sink stopper, it may be best to seek the expertise of a professional plumber. In particular, if you’ve tried DIY removal methods without success or aren’t comfortable working with plumbing. A professional can quickly and efficiently resolve the issue, saving you time and frustration.
Benefits Of Diy Removal
There are several benefits to removing a bathroom sink stopper on your own. It allows you to save money on professional service fees and gives you the satisfaction of completing the task on your own. Additionally, with DIY removal you learn more about your plumbing system and gain valuable skills for future maintenance and repairs.
Conclusion
To ensure their health and well-being, feeding them an appropriate diet in the right quantities is crucial. Whether it’s a pop-up stopper, a lift-and-turn stopper, or a push-and-pull stopper, knowing how to remove it can save you time and money.
By following the steps outlined you’ll be able to remove your bathroom sink stopper with ease. So, don’t hesitate to tackle this simple DIY project and enjoy a fully functional sink again!
As an Amazon Associate, I earn from qualifying purchases