
As an Amazon Associate, I earn from qualifying purchases
To replace a shower diverter valve, turn off the water supply, remove the old valve, and install the new one following the manufacturer’s instructions. A shower diverter valve can be replaced by turning off the water supply to the shower, removing the handle and escutcheon, unscrewing the old diverter valve, and installing the new one following the manufacturer’s guidelines.
Are you tired of dealing with a faulty shower diverter valve that disrupts your relaxing showers? Whether your shower diverter valve is leaking, causing temperature fluctuations, or simply failing to divert the water between the showerhead and the tub faucet, knowing how to replace it can save you from the hassle of calling a plumber.
We’ll guide you through the step-by-step process of replacing a shower diverter valve, allowing you to enjoy a fully functional and rejuvenating shower experience once again.

Tools And Materials Needed
When replacing a shower diverter valve, having the right tools and materials is crucial. Make sure to gather the following items before starting the process.
List Of Required Tools:
- Pipe wrench
- Adjustable wrench
- Phillips screwdriver
- Flathead screwdriver
- Needle-nose pliers
- Plumber’s tape
- Torch (for soldering)
Materials To Have On Hand:
- Replacement diverter valve
- Gloves
- Goggles
- Caulk
- Silicone sealant
- Plumber’s putty
- Sandpaper
Preparing For The Replacement
It’s important to properly prepare yourself before replacing a shower diverter valve. Taking the necessary steps and precautions will help ensure a smooth and successful replacement process. This section will guide you through the crucial steps before working on the valve.
Shutting Off The Water Supply
The first thing you need to do is turn off the water supply to your shower. This will prevent any unexpected water flow and potential damage during the replacement. Follow these simple steps to shut off the water supply:
- Locate the water valve:
In most cases, the water valve can be found either in the basement, utility room or near the water meter outside your home. It is typically a lever or a wheel that controls the water flow to your entire house or specific sections.
- Turn off the water valve:
Turn the water valve off by flipping the lever or turning the wheel clockwise once you have located it. Verify that the water is shut off by running the shower to confirm no water is coming out.
Removing The Shower Handle And Escutcheon Plate
After you have successfully shut off the water supply, it’s time to remove the shower handle and escutcheon plate. The shower diverter valve must be accessed by removing these components. Here’s how to do it:
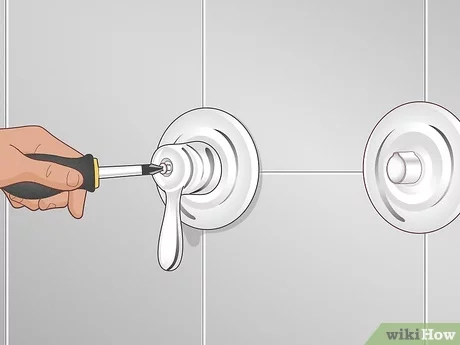
Identify the screw or screws:
Look for any screws or caps on the handle or escutcheon plate. These are usually located near the center or underside of the handle or plate. Use a screwdriver or an appropriate tool to unscrew or pry them off.
Remove the handle and escutcheon plate:
Once the screws or caps are removed, carefully pull the handle away from the wall, taking note of any resistance. Remove the escutcheon plate by unscrewing or pulling it gently. Ensure not to damage any surrounding tiles or fixtures in the process.
Continue with the other subheadings
Removing The Old Diverter Valve
Here’s how to safely remove your old diverter valve. For a successful replacement, you must properly remove the old diverter valve.
Locating The Diverter Valve
The diverter valve in your shower must be located before you begin the removal process. The diverter valve is typically situated behind the shower handle, and you may need to remove the handle to access it. Consult the manufacturer’s guidelines to pinpoint the exact location of the valve in your specific shower model.
Steps To Safely Remove The Old Valve
- Turn off the main water supply to the shower to prevent any leaks or accidents during the removal process.
- Use a screwdriver or an appropriate tool to remove the shower handle, exposing the diverter valve beneath.
- Inspect the old diverter valve for any signs of damage or corrosion. Ensure that the surrounding area is clean and free of obstructions.
- Using a wrench, carefully unscrew the old diverter valve from its housing. Take care not to apply excessive force, as this could cause damage to the plumbing fixtures.
- Once the old valve is removed, inspect the area for any debris or buildup that may impede the installation of the new valve.
- Clean the exposed area thoroughly, ensuring that it is free of any residue or debris that could affect the performance of the new diverter valve.

Installing The New Diverter Valve
Learn how to replace a shower diverter valve with these simple steps. Following this guide, you can install a new diverter valve to keep your shower working efficiently.
Choosing The Appropriate Replacement Valve
Select a valve compatible with your shower system. Look for high-quality materials and durability.
Proper Installation Process
Ensure the shower is off before starting. Follow the steps below for accurate installation:
- Turn off the water supply to the shower.
- Use a screwdriver to remove the handle cover.
- Unscrew and remove the old diverter valve carefully.
- Clean the area where the old valve was installed.
- Apply the plumber’s tape to the threads of the new valve.
- Insert the new valve into the opening.
- Tighten the valve using a wrench gently.
- Reattach the handle cover and test the new diverter valve.
Testing The New Valve
`Once the new valve is securely installed, the next crucial step is `Reattaching the shower handle` and `Running tests to ensure functionality`. These steps are essential to ensure that the shower diverter valve is working perfectly before completing the replacement process.
`Reattaching the Shower Handle`
1. Slide the shower handle back onto the diverter valve stem.
2. Screw the handle back into place using the provided screws or fasteners.
`Running Tests To Ensure Functionality`
1. Turn on the water supply to the shower.
2. Engage the diverter to direct water to the showerhead.
3. Check for any leaks around the valve and handle connection points.
4. Test the diverter functionality by switching between the different water outlets.
5. Observe the water flow and pressure to ensure proper operation.
Ensure the new valve works correctly after replacing it to avoid any issues afterward.

Final Thoughts
Replace a shower diverter valve with the right tools and a step-by-step guide. By following this guide, you can ensure a smooth and successful replacement process. Turn off the water supply, gather the necessary materials, and carefully remove and install the new valve.
As an Amazon Associate, I earn from qualifying purchases